
I’m a day late, but nonetheless, I have a finished object to share with you all. This week I’m talking all about the gigantic Painting Bricks Shawl, a pattern by Stephen West.

The usual details first:
Pattern: Painting Bricks Shawl / Stephen West
Yarn: Main Color: agirlandherwool / Sock Base / Denim
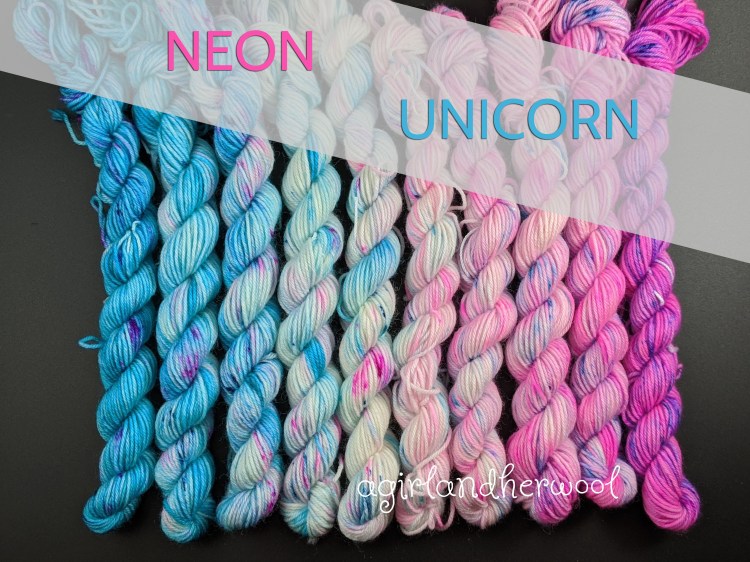
Contrast Color: agirlandherwool / Sock Base / Neon Unicorn Gradient
Needles: Size 4
Cast on: 4/25/2020
Cast off: 6/8/2020
The pattern page on Ravelry can be found here.
I feel like knitting this shawl is a lot like running a race. At first, you’re excited, at some point you’re thinking ‘okay this is going on for a while’ and then at the end you think ‘I’ve been doing this forever’ until after you’ve crossed that finish line and think ‘that wasn’t so bad. I could have done waaay better.’
I’m always looking and thinking of great patterns to use as samples for my shop. In particular, I love dyeing mini skeins, mini skein sets and gradients. THey’re just so fun to dye and look at. I often get asked “I love this, but what should do I do with it.” I recently held a virtual trunk show and prepped for this question by looking up quite a few patterns. One of them was a new-ish pattern from Stephen West, the Painting Bricks shawl. It’s designed to be knit up with minis and the way the pattern is, it just seemed like such a good gradient pattern. Now that I’m done, I still believe that!
Overall, this pattern is really simple and looks great. If you are a newer knitter, definitely give this a shot, but expect for it to take a while. The rows get long.
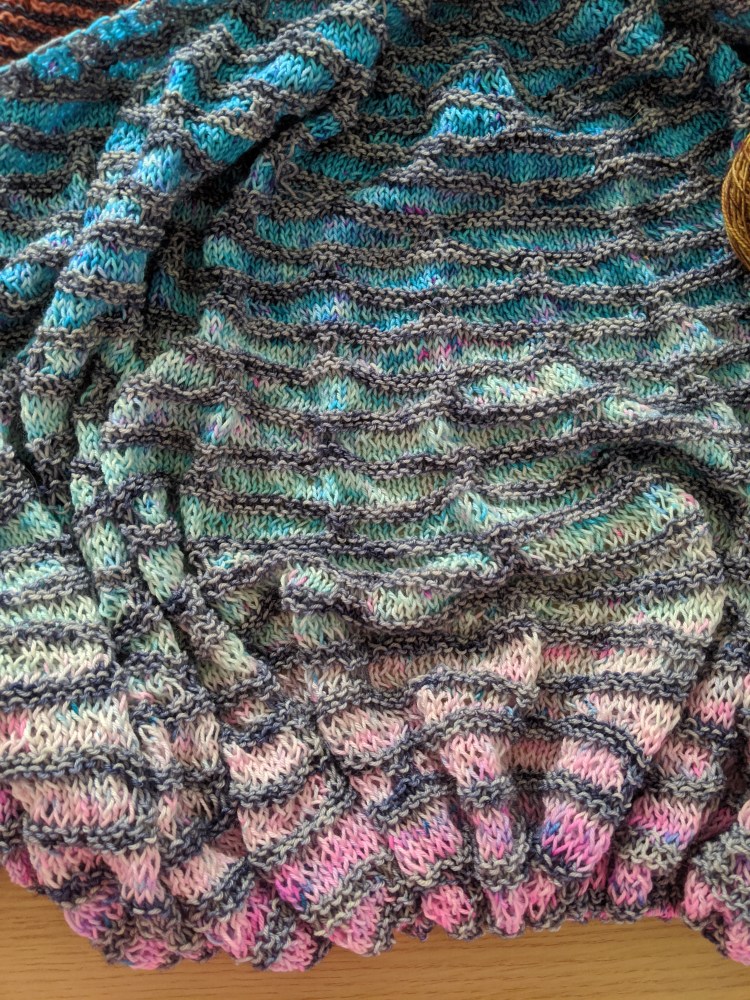
I knit this using 15g mini skeins of the Neon Unicorn gradient from my shop. As the row start off short and get longer (I’ll probably remind you of this many times), the first few colors cover a lot more repeats of the pattern than the later ones. I decided to try and control this a bit by having a plan to use less of the turquoise skeins and more of the pink skeins. I should also say that the first change I made to the pattern was to not cut the contrast colors at the end of each repeat. The way the pattern is set up is you do each repeat (or row of bricks) in one color and then move onto the next. He then repeats his color progression throughout the shawl. I knew I wanted to just go through the gradient once and so I did not cut the contrast skeins after each row of bricks.
Once I knit to the border, I realized I didn’t use enough of the blue skeins and I wasn’t going to have enough to finish the shawl. I made the (not so hard) decision to rip it back. I will say that if this wasn’t going to be for a shawl sample, I would have kept going and just ended the shawl early. But anyway, I ended up ripping back most of the shawl at this point. I believe it was back to the 3rd mini skein.
I got back to the border, which is a chevron pattern. In the sample that Stephen shows with the pattern, he starts his color progression over again at the start of the border. I think this helps to separate the body of the shawl from the border. In my version, it just started somewhere in the pink skeins and so there was really no clear cut separation from the body to the border. I wasn’t a huge fan of how that was working out and so once again, I ripped it back. I ended up just knitting more repeats of the body recipe until I ran out of yarn. In the end, for the gradient style, I think the crescent shape shawl looks great and I wouldn’t change anything about it.
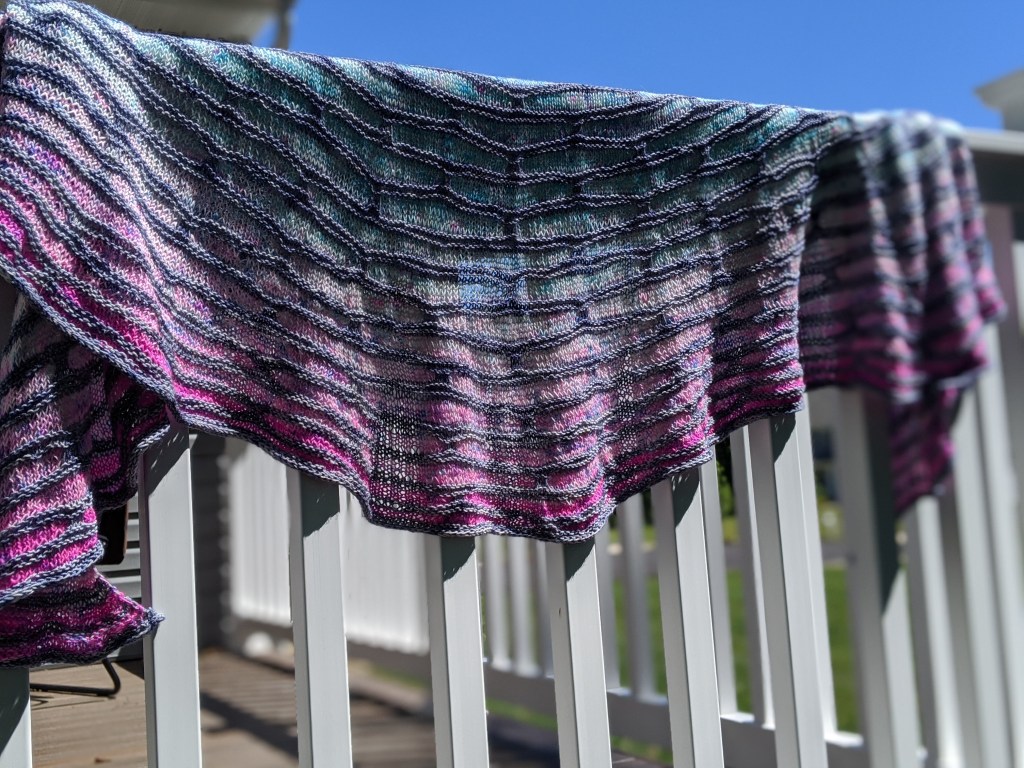
Well. Just one thing. It is HUGE. This shawl is so big! I will say that I didn’t get gauge. I do normally swatch for patterns, but I do not swatch for shawls. To me, that doesn’t really matter as it doesn’t need to fit. If I were to do this pattern again, I would knit it with a much smaller needle and remove some of the repeats. This means that I probably would have been fine to just knit it the way I originally had it without most of the blue skeins and it would have turned out with a much better fit. When I first washed it, it went down to my knees! Now, I’m short, but it went down to my knees!! My knees! So, I did something I’ve never done before. I put the shawl into the dryer.
Yup. The dryer.
I put my shawl into the dryer and you know what, it turned out fine! We all are here to tell the tale. I put it in (still wet) for about 10 minutes. Nothing seemed to have really changed then, so I did it for another 20. At this point, it was much dryer and maybe a tad smaller. I decided to just lay it out at that point and see what happened.
Now that it’s dry, it goes down to my waist. Better, but the width of it is also so large (being crescent and not triangular) and so to me, it’s just not wearable. Again, I’m totally fine with that as it’s meant to be a sample and not worn. It’ll do a great job showing off the gradient kit, which is why I knit it up in the first place.
Overall, I’m happy with the results although I would change some things (smaller needles, less yarn). I would also consider knitting the rectangular Painting Bricks wrap next time instead. I think without the change in the length of rows, it’ll work better for the gradient. Go check it out!
Stay tuned for an update on all of my WIPs this upcoming Wednesday. After I finished this shawl, I picked up a few projects from my recent cast on party.
You can always check out my YouTube channel if you like seeing videos as well. There’s a new video up where I talk more about this shawl.